It was 5:15 PM on a Tuesday, and my kitchen looked like a tornado had hit it. My husband had just walked in, looking at his watch with that specific expression that says “I’m hungry but I’m also tired,” and my kids were arguing over who got the last slice of cheese. We had nothing planned for dessert. No ice cream in the freezer (oops), no fruit salad, and definitely no store-bought cookies that didn’t taste like cardboard.
I stared into the pantry. Flour. Sugar. Butter. And, tucked in the back, a package of Oreos that I’d bought for a party three weeks ago and completely forgot about.
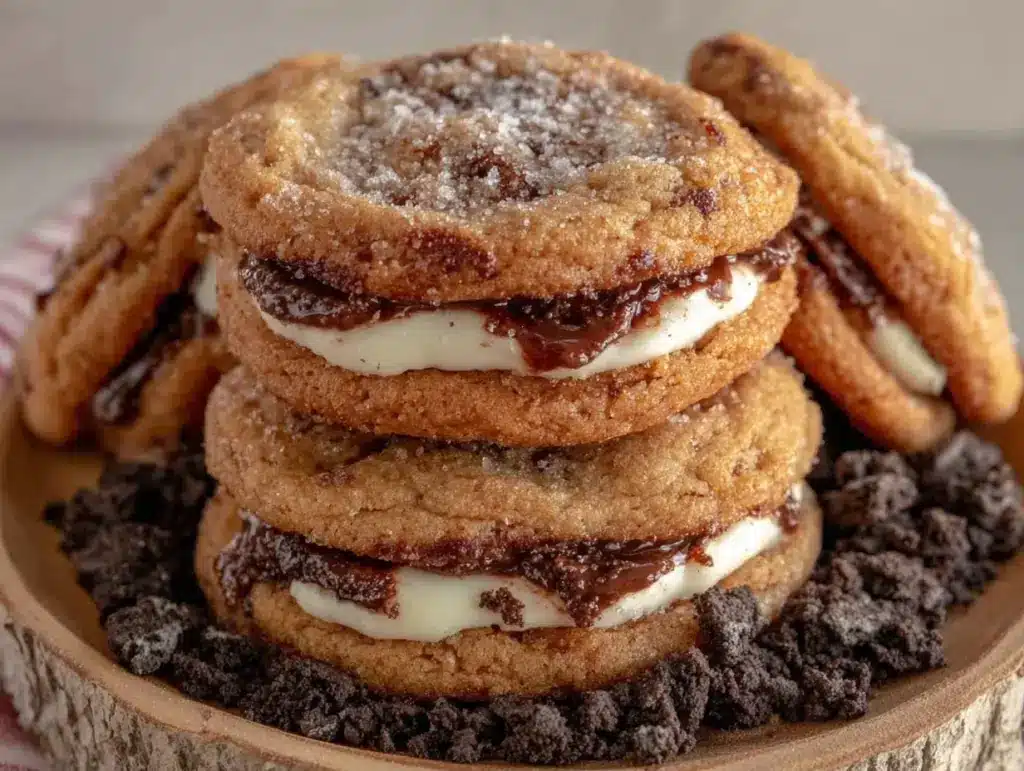
That’s when I decided to make these soft Oreo stuffed cookies. I know what you’re thinking: “Isn’t that just an Oreo dipped in cookie dough?” Sort of. But the version I’ve perfected—the one with the crushed cookie crumbs mixed into the dough for extra texture and the whole Oreo hidden deep inside—changes everything. They’re gooey, they’re chewy, and they take less time than ordering takeout.
I’ve made these at least ten times since that chaotic Tuesday. They’ve saved dinner dates, become the star of playdate snack boxes, and even replaced the need for a fancy dessert when friends drop by unexpectedly. If you’re staring at the clock right now, wondering what to do when the sun goes down and the hunger hits, this is your answer. It’s the ultimate 5pm dinner win, even if dinner is technically just dessert.
Why You’ll Love This Recipe
There’s a reason these cookies have taken over my weeknight routine. They’re not just sweet; they’re a texture dream. Here’s why they’re worth the 20 minutes of active time:
- Zero Stress, Maximum Reward — Seriously, if you can scoop dough, you can make these. I’ve made them while my kids were doing homework in the next room. No complex techniques, no tempering chocolate, no fancy equipment. Just scoop, stuff, bake.
- The Crunch Factor — Most stuffed cookie recipes are just soft dough around a soft center. These are different. By crushing half the Oreos and mixing them into the dough, you get little crunchy pockets of cookie in every bite. It adds a texture that keeps you coming back.
- Uses Up Leftover Oreos — We all have that half-eaten package of Oreos sitting in the cupboard. This recipe is the perfect way to use them up before they go stale. It turns a forgotten snack into a gourmet treat.
- Perfect for Batch Cooking — These freeze beautifully. I often make a double batch, freeze the raw dough balls, and pull them out when I need a quick fix. It’s like having homemade cookies ready to go in under 15 minutes.
- Everyone Loves Them — From my picky 7-year-old to my husband who claims he “doesn’t like sweets,” these are a hit. The saltiness of the cookie cream balances the sugar perfectly.
Real talk: these are easier than making brown butter snickerdoodles because you don’t have to wait for the butter to brown, and they’re more fun than Greek yogurt blondies because they feel like a real indulgence. If you’re looking for a quick treat that feels homemade but takes zero effort, this is it.
Ingredients You’ll Need
Here’s the best part: you probably have most of these ingredients already. I’m not asking you to go to the store for anything exotic. This is pantry-friendly cooking at its finest.
For the Dough
Unsalted butter (½ cup / 115g) — Room temperature is key. If it’s cold, it won’t cream properly with the sugar. I take mine out about 30 minutes before I start. If I’m in a rush, I microwave it for 10 seconds at a time.
Granulated sugar (½ cup / 100g) — This helps create that slightly crisp edge. Don’t skip it for brown sugar alone; you want that contrast.
Brown sugar (½ cup / 115g) — Packed. This is what makes the cookies chewy and soft. Dark brown sugar is even better if you want a deeper molasses flavor, but light works fine.
Egg (1 large) — Room temperature. It helps bind everything together. Don’t use cold eggs from the fridge if you can help it.
Vanilla extract (2 teaspoons) — Use the real stuff. The cheap imitation stuff can taste chemical-y in delicate cookies like these.
All-purpose flour (1 ¾ cups / 220g) — Spoon and level, don’t scoop. Scooping packs the flour down and makes dry cookies. If you don’t have a scale, fluff the flour with a spoon, scoop gently, and level it off with a knife.
Baking powder (1 teaspoon) — Check the date! Old baking powder makes flat cookies.
Salt (½ teaspoon) — Essential for balancing the sweetness. Don’t skip it.
Crushed Oreos (1 package / 15 cookies, crushed) — We’ll use half of a standard family-size pack for mixing into the dough. You want fine crumbs, not chunks.
For the Filling

Whole Oreos (10-12 cookies) — Use the standard size. The double-stuff ones work too, but be careful not to overfill, or they might burst during baking.
Equipment Needed
You don’t need fancy gear for this. Here’s what I actually use:
Large mixing bowl — I use a 4-quart stainless steel bowl. It’s sturdy and easy to whisk in.
Hand mixer or stand mixer — For creaming the butter and sugars. A wooden spoon works if you have strong arms, but a mixer is faster and ensures no lumps of butter.
Mixing spoon or spatula — For folding in the flour and crushed Oreos.
Baking sheets — Two standard 13×18 inch sheets. I line them with parchment paper for easy cleanup. I hate scrubbing baking sheets.
Parchment paper — Non-negotiable. It prevents sticking and makes cleanup a breeze.
Cooling rack — Optional, but good for keeping the bottoms from getting soggy if you have space.
Ziplock bags — For crushing the Oreos. I just smash them with a rolling pin or my hands. It’s therapeutic.
How to Make It: Step-by-Step
Alright, let’s make these! I’m walking you through exactly how I do it, including the little tricks I’ve picked up over the years.
Step 1: Prep Your Oreos (5 minutes)
Open your package of Oreos. Take half of them (about 10-12 cookies) and put them in a ziplock bag. Smash them. You want fine crumbs. I usually use my fist or a rolling pin. Don’t worry about being precise; slightly chunky crumbs add nice texture. Set the crumbs aside.
Keep the other half (10-12 cookies) whole. These will be your filling. If you’re using Double Stuf Oreos, you might want to scrape off a little cream so the cookies don’t burst, but standard Oreos are perfect as-is.
Step 2: Cream the Butter and Sugars (3 minutes)
In your large bowl, beat the softened butter, granulated sugar, and brown sugar together. If you’re using a hand mixer, beat on medium-high for about 2-3 minutes. You want the mixture to look pale, fluffy, and creamy. This step incorporates air, which helps the cookies rise slightly. If you’re doing it by hand, this will take about 5 minutes of elbow grease.
Step 3: Add Wet Ingredients (1 minute)
Beat in the egg and vanilla extract. Mix until just combined. Don’t overmix here. The mixture should look smooth and shiny.
Step 4: Mix Dry Ingredients (2 minutes)
In a separate small bowl (or just measure directly into the main bowl), whisk together the flour, baking powder, and salt. Then, add this dry mixture to the wet mixture along with the crushed Oreo crumbs. Mix on low speed or stir by hand until *just* combined. Stop as soon as you no longer see streaks of flour. Overmixing develops gluten, which makes cookies tough, not soft.
Step 5: Scoop and Stuff (10 minutes)
This is the fun part. Take a scoop of dough (about 2 tablespoons) and flatten it into a disc in your palm. Place one whole Oreo in the center. Carefully fold the dough up and around the Oreo, pinching the seams to seal it completely. Roll it into a ball. Make sure there are no cracks or holes, or the Oreo will leak out.
Place the stuffed cookie ball on a parchment-lined baking sheet. Leave about 2 inches between each one because they will spread.
Step 6: Bake (10-12 minutes)
Preheat your oven to 350°F (175°C). Bake the cookies for 10-12 minutes. They should look set on the edges but still soft and slightly underdone in the center. They will continue to cook on the hot baking sheet after you take them out.
Let them cool on the baking sheet for 5 minutes. This is crucial—they’re very fragile when hot. Then transfer to a cooling rack or eat them warm directly off the pan (I won’t judge).
Step 7: Serve
These are best eaten warm, right out of the oven. The center is gooey, and the Oreo cream is melty. Pair them with a cold glass of milk for the full experience.
Expert Tips & Tricks
Here’s everything I’ve learned from making these dozens of times. These tips will save you from my mistakes.
Don’t Overbake — This is the #1 mistake. These cookies look done when they’re still raw in the middle. Pull them when the edges are just starting to turn golden. The center should look soft. They firm up as they cool.
Chill the Dough (Optional but Recommended) — If you have time, chill the dough balls for 30 minutes before baking. This helps them hold their shape better and prevents excessive spreading. If you’re in a rush, skip it, but expect flatter cookies.
Seal Tight — Make sure you seal the dough around the Oreo completely. If there’s even a tiny crack, the Oreo will stick out and burn. I press the seams firmly with my fingers.
Use Room Temperature Butter — Cold butter won’t cream properly. Microwaving it for too long makes it oily. Aim for butter that’s soft enough to leave a fingerprint but not melted.
Batch Like a Pro — I often make the dough, scoop it, and freeze the scoops on a baking sheet. Once frozen solid, I transfer them to a freezer bag. You can bake them straight from frozen, just add 1-2 minutes to the bake time. This is perfect for last-minute cravings.
Variations & Substitutions
Once you’ve nailed the basic version, here’s how you can mix it up. I’ve tried all of these.
Double Stuff Edition — Use Double Stuf Oreos. Just be careful not to overfill, as they’re more likely to burst. You might need to add a bit more dough to each ball.
Mint Oreo Version — Use mint Oreos for a fun, festive twist. Great for holidays or just because you like mint.
Strawberry Shortcake — Use strawberry Oreos. They’re pink, sweet, and delicious.
Gluten-Free — Use a 1:1 gluten-free flour blend. Most brands work well in cookies. Make sure your Oreos are certified gluten-free if that’s a concern (standard Oreos are not).
Dairy-Free — Use dairy-free butter and dairy-free Oreos (some brands make them, or you can use chocolate sandwich cookies). The texture might be slightly different, but still tasty.
Chocolate Chip Twist — Add ½ cup of chocolate chips to the dough along with the crushed Oreos. Double chocolate, double trouble.
Serving & Storage
How to Serve
I usually serve these warm, right after they’ve cooled for 5 minutes. They’re best enjoyed with a cold glass of milk. I also love serving them at room temperature for lunchboxes or party platters. If you’re having a dinner party, these go great with no-churn vanilla ice cream for a simple dessert.
Storage Instructions
Room Temperature: Store in an airtight container for up to 3 days. They stay soft and chewy.
Refrigerator: Not recommended. The fridge dries out cookies. If you must, store them in an airtight container for up to 5 days, but bring them to room temperature before eating.
Freezer: Yes! Freeze baked cookies in an airtight container for up to 3 months. Thaw at room temperature. Or freeze raw dough balls as mentioned above.
Reheating: Microwave for 10-15 seconds to warm them up and make the center gooey again.
Nutrition Information
I’m not a nutritionist, but here’s the breakdown if you’re tracking. Keep in mind, these are indulgent cookies, so enjoy them in moderation.
Per Cookie (based on 12 cookies):
- Calories: ~380
- Protein: 4g
- Carbs: 52g
- Fat: 18g
- Sugar: 34g
Look, this is a treat. It’s not a health food. But it’s way better than store-bought cookies, and you know exactly what’s in it. When I make these, I usually limit myself to two or three, and that’s plenty sweet enough.
Final Thoughts
So that’s my go-to soft Oreo stuffed cookies! I’ve probably talked your ear off at this point, but when you make a recipe this often, you have a lot to say about it. These cookies have saved me more times than I can count. They’re my answer to “what’s for dessert?” when I’m tired, don’t want to leave the house, and still want something that tastes really good.
Make them yours! Try different Oreos, add chocolate chips, or just enjoy them as is. The best recipes are the ones you adapt to your family’s tastes. If you make these, drop a comment and let me know what you think! I love hearing how recipes turn out in your kitchen. And if something doesn’t work, tell me that too—I’m here to help troubleshoot.
Happy baking! And I hope your kitchen smells half as good as mine does right now.
Frequently Asked Questions
Can I use mini Oreos instead of regular ones?
Yes, but you’ll need to adjust the dough. Use about 3-4 mini Oreos per cookie instead of one regular Oreo. You can also crush the mini Oreos and mix them into the dough for extra crunch. Just be careful not to overfill.
Why did my cookies spread too much?
Usually, this means the butter was too warm or melted. Make sure your butter is soft but not liquid. Also, don’t overmix the dough, and make sure your baking powder is fresh. Chilling the dough for 30 minutes before baking also helps prevent spreading.
Can I make these ahead of time?
Absolutely! Make the dough, scoop and stuff the cookies, then freeze them on a baking sheet. Once frozen, transfer to a freezer bag. Bake them straight from frozen, adding 1-2 minutes to the bake time. This is perfect for meal prepping.
Can I use chocolate sandwich cookies instead of Oreos?
Yes! Any chocolate sandwich cookie with cream filling works. Nabisco Nilla Wafers with cream filling (if you can find them) or other brands of chocolate sandwich cookies will work great. Just make sure they’re sturdy enough to hold the dough.
How do I store leftover cookies?
Store them in an airtight container at room temperature for up to 3 days. If they start to get soft, you can crisp them up in the oven at 300°F for 5 minutes. Avoid refrigerating, as it dries them out.
Can I double the recipe?
Yes, double everything! Just make sure you have a large enough bowl to mix the dough. You might need to mix in batches if your mixer is small. The baking time stays the same.
Do I need to use an electric mixer?
No, you can do this by hand. It just takes a bit more effort to cream the butter and sugars. Use a sturdy wooden spoon or a spatula. It’s a good workout!
Pin This Recipe!


Soft Oreo Stuffed Cookies
- Total Time: 30 minutes
- Yield: 12 cookies 1x
Description
Soft, chewy cookies stuffed with a whole Oreo and mixed with crushed Oreo crumbs for extra texture. A quick, stress-free dessert that takes less than 20 minutes of active time.
Ingredients
- 1/2 cup (115g) unsalted butter, room temperature
- 1/2 cup (100g) granulated sugar
- 1/2 cup (115g) packed brown sugar
- 1 large egg, room temperature
- 2 teaspoons vanilla extract
- 1 3/4 cups (220g) all-purpose flour
- 1 teaspoon baking powder
- 1/2 teaspoon salt
- 1 package (15 cookies) Oreos, crushed into fine crumbs
- 10–12 whole Oreos (standard size) for filling
Instructions
- Preheat oven to 350°F (175°C) and line two baking sheets with parchment paper.
- Crush half of the Oreos (about 10-12 cookies) into fine crumbs using a rolling pin or hands. Set aside.
- In a large bowl, beat the softened butter, granulated sugar, and brown sugar together until pale, fluffy, and creamy (about 2-3 minutes with a mixer).
- Beat in the egg and vanilla extract until just combined and smooth.
- In a separate bowl, whisk together the flour, baking powder, and salt.
- Add the dry ingredients and crushed Oreo crumbs to the wet mixture. Mix on low speed or stir by hand until just combined. Do not overmix.
- Scoop about 2 tablespoons of dough and flatten into a disc in your palm.
- Place one whole Oreo in the center of the dough disc.
- Fold the dough up and around the Oreo, pinching the seams to seal completely. Roll into a ball.
- Place the stuffed cookie balls on the prepared baking sheets, leaving 2 inches between each.
- Bake for 10-12 minutes until edges are set but centers are still soft.
- Let cookies cool on the baking sheet for 5 minutes before transferring to a cooling rack or serving warm.
Notes
Do not overbake; the centers should look soft as they firm up while cooling. For best results, use room temperature butter. You can freeze raw dough balls for up to 3 months and bake straight from frozen, adding 1-2 minutes to bake time. Store in an airtight container at room temperature for up to 3 days.
- Prep Time: 20 minutes
- Cook Time: 10-12 minutes
- Category: Dessert
- Cuisine: American
Nutrition
- Serving Size: 1 cookie
- Calories: 380
- Sugar: 34
- Sodium: 250
- Fat: 18
- Saturated Fat: 10
- Carbohydrates: 52
- Fiber: 1
- Protein: 4
Keywords: Oreo cookies, stuffed cookies, easy dessert, 5pm dinner, soft cookies, chocolate sandwich cookies, quick baking